Blog Posts

Creating Svg Badges with C
TLDR;
I wrote a small C# dotnetcore commandline tool for windows to generate svg badges like:


That you can install over chocolatey:
choco install badger
badger.exe -o result-success.svg -l "Testresults" -r "100/100" --lc #444444ff --rc #00ff00ff
Background
I wanted my CI build results to contain nice svg badges like the ones above and I didn’t want to use some internet service, because the build itself shouldn’t depend on internet access and external services.
An option would be to design the svg using a vector design tool like inkscape and export an svg and then use a script to replace the corresponding colors and text.
But that has it’s own drawbacks - it’s very difficult to modify later on and positioning the items before you know the text is tricky - you might need to make your script smart enough to adjust the size of items as well.
Why not go all the way then and write a small commandline application that can create svgs from scratch? So that’s what I did.
Creating Svgs with SkiaSharp
For generating the svg files, I chose the excellent SkiaSharp library (about which I’ve written already here), which has a built-in Svg Backend. Thanks to SkiaSharp, creating a small commandline app that can create an Svg File consists basically of parsing the input and calling the right drawing methods.
I’ve called the tool badger and uploaded it to github.
If you are interested in the code, check out SvgService.cs which handles the Svg-File export and calls BadgeService.cs in turn, which handles the actual drawing.
You can download the source code from github and build it yourself:
git clone https://github.com/8/badger
cd badger
build
Installation with Chocolatey
Now the only thing that’s missing is a nice way to install it. I wasn’t in the mood of writing an WiX or an nsis installer, because their overkill for a simple commandline app that you can basically xcopy deploy.
On the other hand that doesn’t solve the question of where to upload the installer and how to find the link when you later on need it.
For installing applications and upgrading them on my windows machines, I am a fan of chocolatey, which is package manager for windows, that’s based on nuget. Chocolatey puts the installed executable automatically on your PATH, which is really useful for all commandline tools.
For Windows, I’ve created a package of the compiled executable and pushed it to chocolatey. You can install it using:
choco install badgerIt’s based on the .NET 4.7 Framework, so you need to make sure that it’s installed.
Using the tool
After you’ve build the tool or installed it with chocolatey you can invoke it like that:
badger.exe -o result-success.svg -l "Testresults" -r "100/100" --lc #444444ff --rc #00ff00ffWhich will create the following svg file:
Resources
Docker Cheatsheet
TLDR;
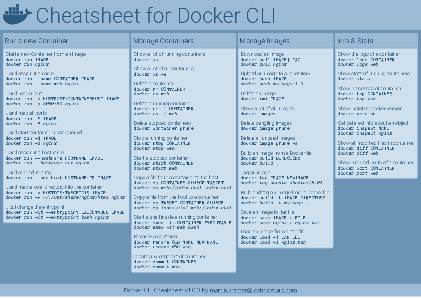
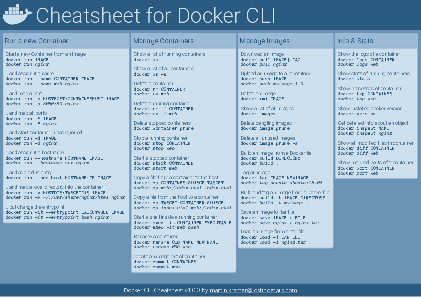
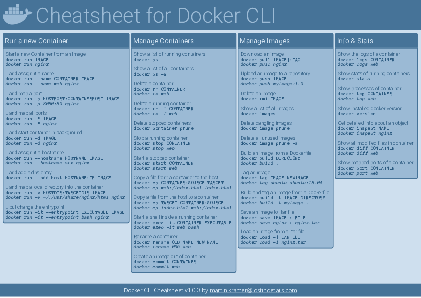
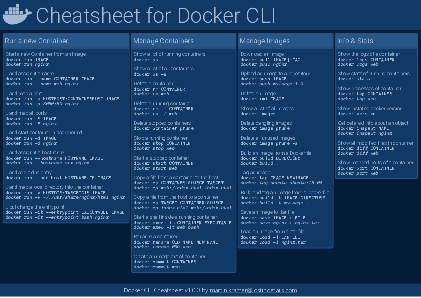
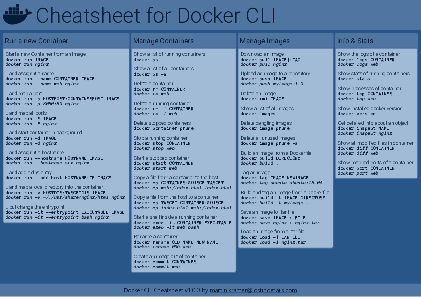
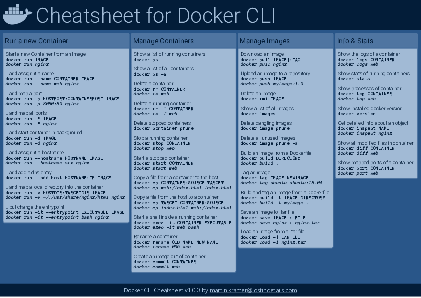
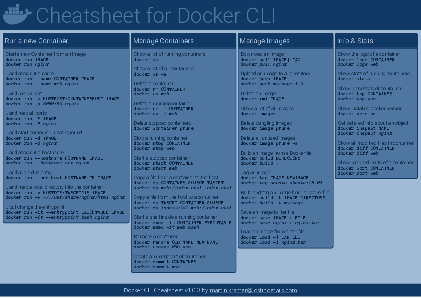
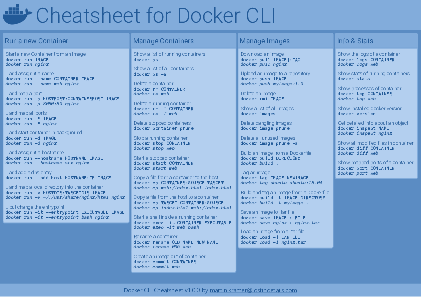
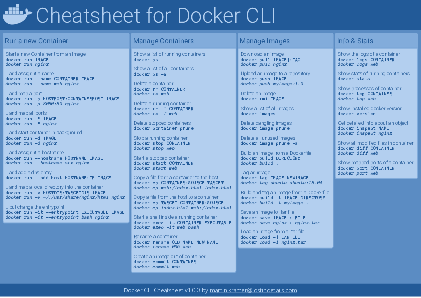
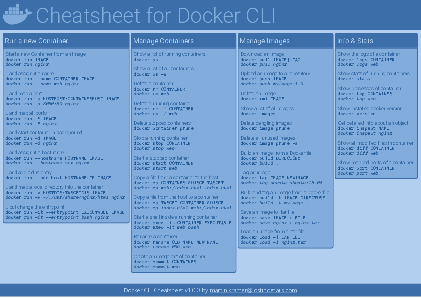
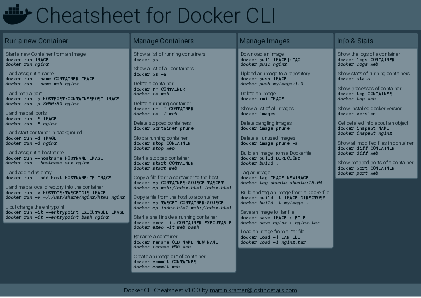
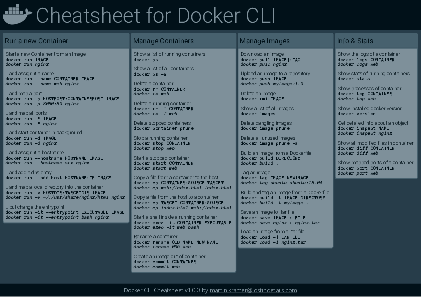
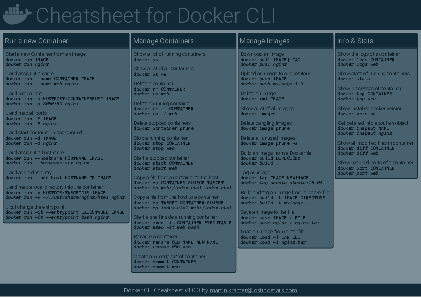
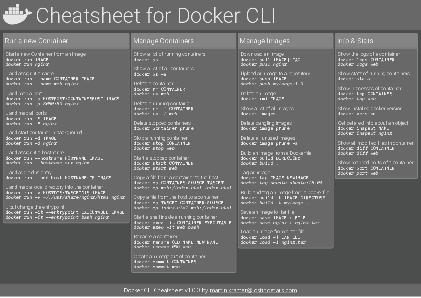
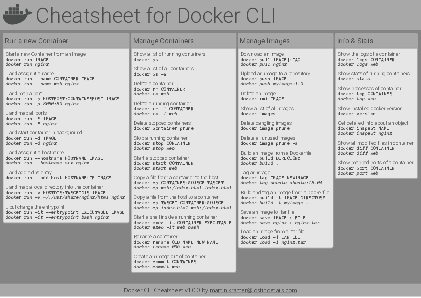
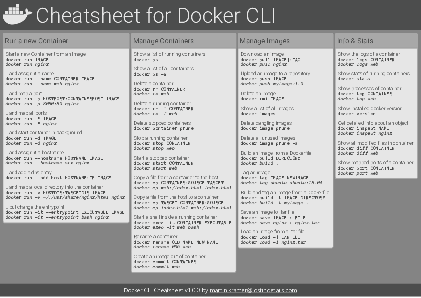
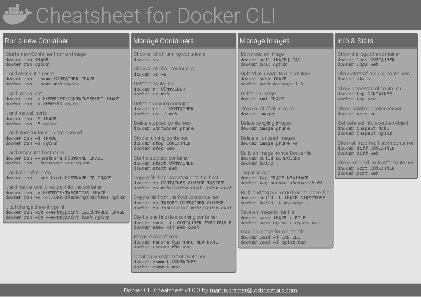
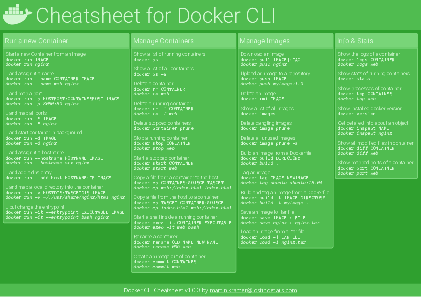
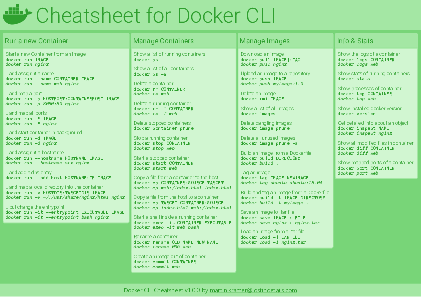
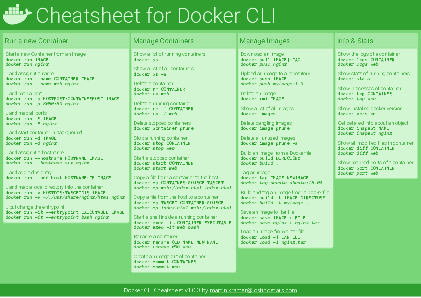
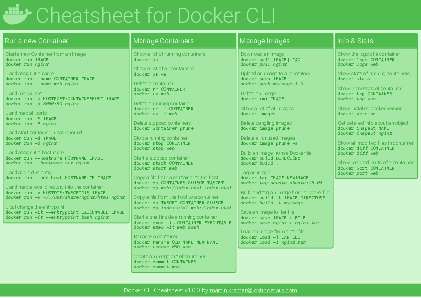
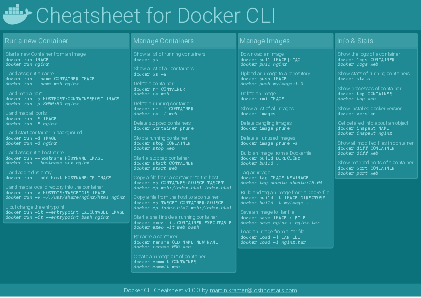
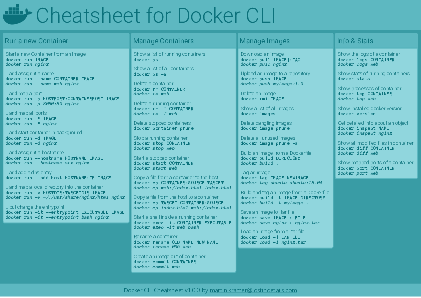
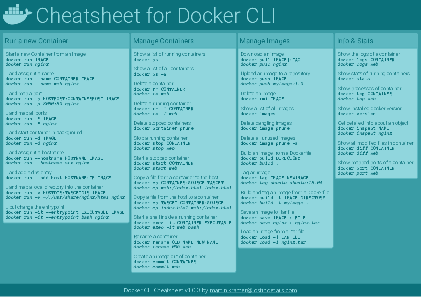
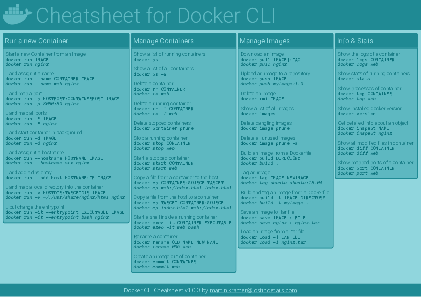
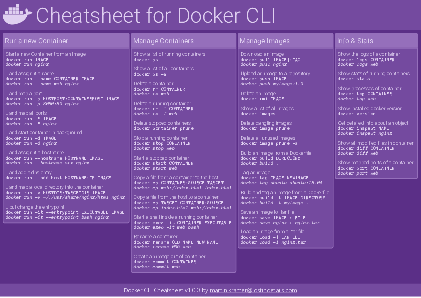
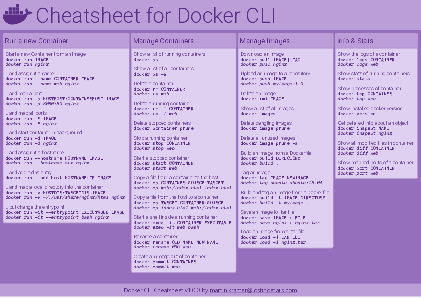
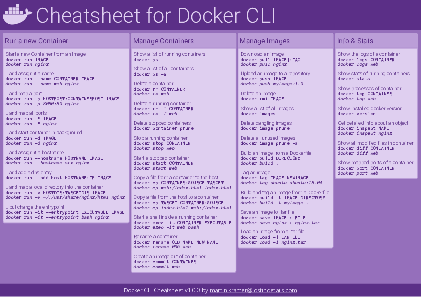
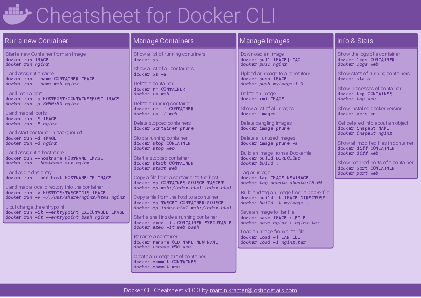
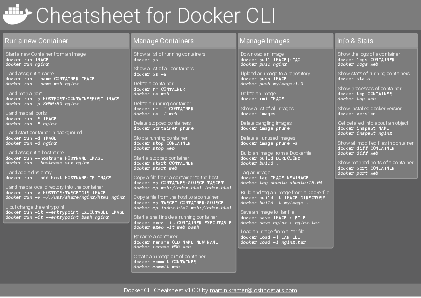
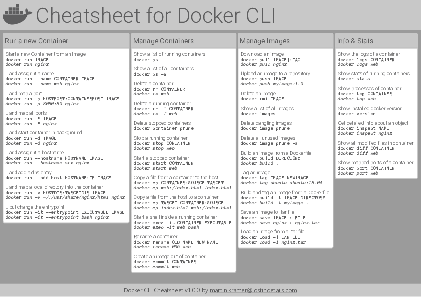
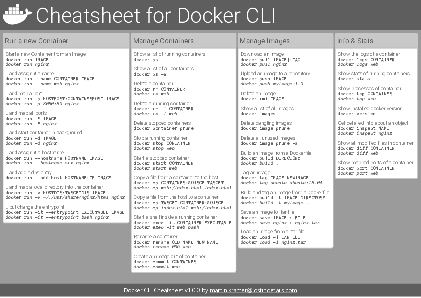
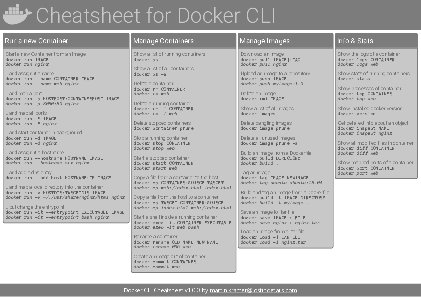
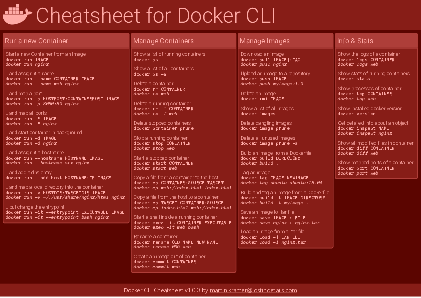
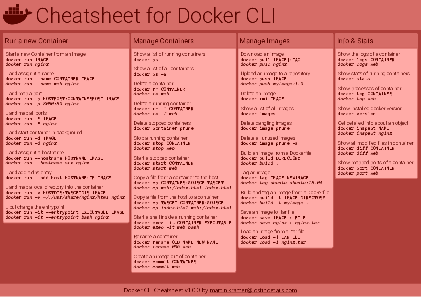
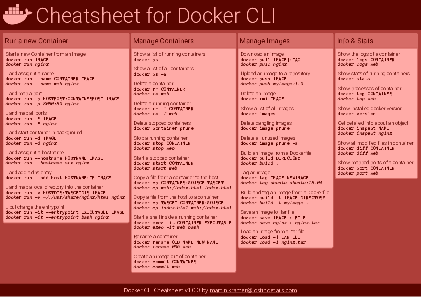
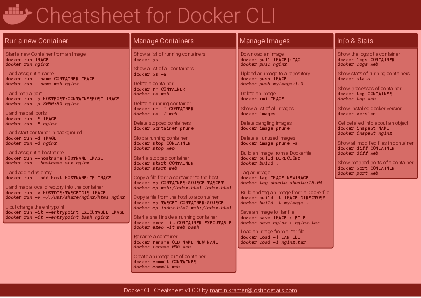
I’ve created a docker cli cheatsheet in different colors. If you want to download the pdf scroll to the bottom.
Background & Goals
I’ve been working with docker extensively for the last few months and while I find the technology really useful, I’ve noticed that newcomers are often overwhelmed by the slew of commands and options available and I am only talking about running some containers - not to mention orchestrating them or building images.
As more and more people have been asking me what they can do with docker and what’s the command for that, I’ve thought about writing up the commands that I found most useful.
The solution
This week, I finally had enough time and created a 1-page docker cli cheatsheet that you can download as a pdf and print.
If you happen to spot a mistake or I am missing your favourite docker command/option, please feel free to message me or comment, maybe I can squeeze it in.
Because I am not a designer, I’ve generated the docker cheatsheet in a couple of different color themes in hope that you might find a color that you’ll like.


A Quick Look at OAuth2
TLDR;
If you need to access OAuth 2.0 protected resources, than go ahead and use the official SDK from your OAuth 2.0 provider, if available.
If you want to implement the server-side you might want to reconsider, as OAuth2 is both complicated and doesn’t do what you need on it’s own.
Background & Goals
Recently I’ve taken a look at OAuth2, to find out if it’s a good fit for projects I am working on. To be specific, I was wondering if I should implement it as my means of Authentication.
I was looking for a framework that:
- should be simple to understand / straightforward to implement
- should allow my app to receive basic information about the user
- should allow my server to deliver content based on the users identity
In this article I present why I don’t think that OAuth 2.0 meets those requirements. Should your requirements look like mine, then I suggest you rethink if you really want to use OAuth 2.0.
Disclaimer: Every use case is different - so if you find that it still makes sense to deploy OAuth 2.0 in your system then don’t feel discouraged to do so!
Note: If you are only interested in accessing OAuth 2.0 protected content from another service provider - that is if you are only implementing the client, then you have no choice anyway and can go ahead!
First let’s take a look and what OAuth 2.0 is and who is using it.
So let’s get started!
What is OAuth 2.0?
The short version:
OAuth 2.0 is a delegated authorization framework for the enterprise.
For the long version, you can read all about OAuth 2.0 in it’s 70+ pages rfc 6749.
It also has a dedicated homepage at https://oauth.net/2 and a wikipedia page.
When talking about resources to read about OAuth 2.0, I think it’s worth mentioning that the lead author Eran Hammer was unhappy about the path that it has taken and resigned and had his name removed from the project. You can read up on his reasons for doing so on his blog.
Also we will find out that there are 2 additional RFCs that you may need to get familiar with,
Who is using it?
If you are going to use a technology, it doesn’t hurt to take a look at who is also using it. In this case, it’s the big players:
- Amazon
- Microsoft
If you want to take a look yourself, here is a wikipedia page that lists a number of known OAuth service providers. But not all of them implement 2.0 - many are still using 1.0 and 1.0a.
On one hand this looks rather promising, as a lot of big companies have embraced OAuth 2.0. On the other hand quite a few decided to not upgrade from an older implementation like 1.0 to the newer 2.0 version, even though Version 2.0 was published in October 2012.
How does it work?
At it’s heart, OAuth 2.0 specifies a flow that defines:
- which party is calling which party
- in what order those calls are made
- and what is the data that is being exchanged
To understand it, you need to learn it’s terminology and learn about the specific flows it supports. The flows take advantange of the terminology, so you need to understand the terminology first - that’s why I’ll start with those.
OAuth 2.0 Terminology
To make sense of it, you’ll need to learn it’s terminology.
Involved Parties
First you need to know about the involved parties:
- Client
- A client application, e.g. your web-, mobile- or desktop-app.
- Resource Owner
- The user of your app who also happens to have access to some content on an OAuth 2.0 protected server.
- Resource Server
- An OAuth 2.0 protected server that serves some content if you hand it a valid
Access Token. - Authorization Server
- A server that the
Resource Servertrusts. It hosts a login page, that the user logs into. After the user logs in successfully and confirms the request, it will issue anAuthorization Grant. It will also exchange anAuthorization Grantfor anAccess Tokenfor the client.
Exchanged Objects
Then you need to know about the objects being being exchanged between those parties:
- Resource
- A
Resourceis some user content protected by OAuth 2.0 and provided by aResource Server. - Authorization Request
- The
Authorization Requestis what happens when your App requests access to aResourceof the User. - Authorization Grant
- The
Authorizaton Grantis returned as a response on a Client’s successfulAuthorization Request. It can be exchanged for anAccess Token. - Access Token
- A token that is used to retrieve content from a
Resource Serverinstead of user credentials. It is issued by theAuthorization Server. - Refresh Token
- An optional token that can be returned by the
Authorization Serverin addition to theAccess Token. It can be used to retrieve additionalAccess Tokenif for example the originalAccess Tokenexpires.
Authorization Grant Types
Then there are different Authorization Grant Types and the choice of the Grant Type influences how the Access Token can be obtained. There are four base Authorization Grant Types specified in OAuth 2.0:
- Authorization Code
- Implicit
- Resource Owner Password Credentials
- Client Credentials
The specifics are not terribly important at the moment - you may want to skim them, as I will call out the differences between them later on. The first one, Authorizaton Code, is the most important one as we will see.
Authorization Code
This is the classic OAuth flow.
- The
Clientredirects theResource Ownerto theAuthentication Server. - The
Clientlogs in, confirms the requested access rights. - The
Authentication Serverredirects back to theClient. - The
Clientexchanges theAuthorization Codeto theAccess Tokenby calling theAuthentication Server.
Note: This is the preferred Authorization Grant Type.
Implicit
- The
Clientredirects theResource Ownerto theAuthentication Server. - The
Clientlogs in, confirms the requested access rights. - The
Authentication Serverresponds directly with theAccess Token.
Resource Owner Password Credentials
- The
Clientasks the user for username and password. - The
Clientsends the username and password to theAuthentication Server. - The
Authorization Serverresponds with theAccess Token.
Client Credentials
- The
Clientsends his own username and password to theAuthentication Server. - The
Authorization Serverresponds with theAccess Token.
OAuth 2.0 Flow
An OAuth flow lists the number and order of steps that are executed between the involved parties. The specific steps depend on the authorization grant type being used.
Let’s start with a simple case, as shown in the abstract protocol flow that is also sketched out in the RFC. It can be visualized in a sequence diagram like this:

This flow would be used if the Authorization Grant Type Resource Owner Password Credentials is used - that’s why the Client would ask the Resource Owner directly.
This flow, although simple, is not the recommended approach. In this flow the Authorization Request is sent directly to the Resource Owner, but in the recommended approach the Client should send it to the Authorization Server as an intermediary for enhanced security of the user credentials.
The preferred flow uses the Authorization Grant Type Authorization Code and looks like that:

But wait, that’s not all - the previous sequence diagramm was still missing the flow for using Refresh Tokens. So here we go with Refresh Tokens added to the mix:

Now we know a little about how the flow looks like, let’s take a closer look at one of the objects that is central to the flow, namely the Access Token.
What are Access Tokens made of?
If you expect that the spec defines how the Access Token should look like, you will be disappointed, because the Access Token is defined only very vaguely as a string.
The RFC does not get any more specific than that - quite the opposite, it states that Access Tokens can have different formats and that those are outside the scope of this RFC but it links to another RFC for further reading.
Bearer Tokens
To get to know more about them you need to read the RFC6750 (The OAuth 2.0 Authorization Framework: Bearer Token Usage) which specifies how the Tokens should be used to access the Resource Server.
Even though RFC6750 specifies how Bearer Tokens are to be used, it does not tell us how a reasonable Access Token should be implemented.
JWT - JSON Web Token
This is were JSON Web Tokens come in!
In yet another RFC7519 we learn about an implementation of an Access Token that can be used in OAuth 2.0, called JWT (JSON Web Token).
JWTs are a topic on their own and discussing them in detail is out of scope of this article.
Their main characteristics are:
- they hold certain predefined parameters
- they are extensible with custom parameters
- they can be signed and/or encrypted
- they can be serialized to a string
Those properties make them a perfect fit for Access Tokens. In addition to that, those properties allow them to be self-contained. That means they can contain all necessary information for the Resource Server to verify if the Resource Request of the Client is valid and should be served - the Resource Server doesn’t need to call the Authentication Server or look up additional information.
Now we know enough about what OAuth 2.0 is and how it can be implemented.
Is OAuth 2.0 simple to understand?
To come back to the first question I posed at the beginning: Is it simple to understand and simple to implement?
Well, when I started reading up on OAuth 2.0 I didn’t find a nice succinct writeup on the internet for how it works and what it does.
Now after having read through a few resources, I feel like I know why - because it’s complicated.
Basically, you would have to read, understand and implement at least those three RFCs.
So I would answer that question with: No, I don’t think so.
But that’s not all, IMHO it’s also missing some basic features…
OAuth 2.0 is missing Authentication
When you start reading about OAuth 2.0 you soon will find out that the “Auth” part of it’s name stands for Authorization (and not Authentication) as made clear by both the homepage’s first sentence:
“OAuth 2.0 is the industry-standard protocol for authorization.”
I don’t know if I agree with the first part of the sentence, but the “for authorization” part is spot on.
And the rfc’s header:
“The OAuth 2.0 Authorization Framework”
Authorization vs. Authentication
But why the hair splitting, what’s the difference between Authentication and Authorization?
According to Stackoverflow:
Authentication is the process of ascertaining that somebody really is who he claims to be.
Authorization refers to rules that determine who is allowed to do what. E.g. Adam may be authorized to create and delete databases, while Usama is only authorised to read.
or:
Authentication = login + password (who you are) Authorization = permissions (what you are allowed to do)
OAuth 2.0 doesn’t solve the problem of Authentication, only the problem of Authorization.
That’s too bad, because getting some base info about a user is almost always a requirement for an application. At least you want to show the user as signed in and you want to have some basic info that you can display, like a username, so that the user knows under which account he is signed in.
When I started looking at OAuth 2.0, I was under the assumption that it would provide a solution for this very common problem.
But with a vanilla OAuth 2.0 implementation you are out of luck if you expect that it provides a standard way of handling user profile information.
Because those misconceptions are a widely held belief, there is a nice article on the official site that explains common pitfalls.
In OAuth, the token is designed to be opaque to the client, but in the context of a user authentication, the client needs to be able to derive some information from the token.
This torpedoes my goal that I want my app to receive basic information about the user.
On the other hand, the server that is serving the protected content has the same problem as the provided Access Token is not inherently linked to a specific user. Therefore the Resource Server has no idea which user has originated the request.
Or to quote the article once more:
The protected resource is not generally going to be in a position to tell if the user is still present by the token alone, since by the very nature and design of the OAuth protocol the user will not be available on the connection between the client and protected resource.
Which means that my last goal - that the server should be able to provide info based on the users identity - also doesn’t work out of the box.
Solving the User Information Problem
We can of course solve the problem and add the support for the missing features. One option that comes to mind is:
- Add a User Info Token
- Host a User Info Endpoint
Adding a User Info Token
One workaround to provide that information, would be extending the Access Token Response.
If you take a look at the example of a complete Access Token Response as specified in th RFC:
HTTP/1.1 200 OK
Content-Type: application/json;charset=UTF-8
Cache-Control: no-store
Pragma: no-cache

{
  "access_token":"2YotnFZFEjr1zCsicMWpAA",
  "token_type":"example",
  "expires_in":3600,
  "refresh_token":"tGzv3JOkF0XG5Qx2TlKWIA",
  "example_parameter":"example_value"
}
You can see that additional parameters, like example_parameter can be part of the response. This is specifically supported by the spec by requiring that clients must ignore unrecognized response parameters.
So we are free to add an additional parameter. For example we could add a parameter and set it’s value to another serialized JWT that holds the users profile information. Let’s call this additional token User Profile Token.
The response could then look like this:
HTTP/1.1 200 OK
Content-Type: application/json;charset=UTF-8
Cache-Control: no-store
Pragma: no-cache

{
  "access_token":"2YotnFZFEjr1zCsicMWpAA",
  "token_type":"example",
  "expires_in":3600,
  "refresh_token":"tGzv3JOkF0XG5Qx2TlKWIA",
  "user_profile_token":"..."
}
Now a Client Application is handed profile information of the user in addition to an Access Token and can mirror that information back to the user of the app.
Host a User Info Endpoint
Additionally we could implement a Resource Server that answers a request containing a valid Access Token with our new User Profile Token.
That way, should the User Info returned when retrieving an Access Token have gone stale and is not up to date anymore, a new info can be retrieved.
Open ID Connect
But if that’s such a common use case, wouldn’t it be great if the approach of using a second token and additionally supplying a Resource Server that works as a User Info Endpoint would also be part of a standard?!
That’s why a similiar approach is already standardized in yet another spec called Open ID Connect. Therefore Open ID Connect is basically an authentication layer on top of OAuth 2.0.
So before going down the custom route, it may make more sense to implement Open ID Connect instead - but either way, it’s not part of OAuth 2.0.
In the end having no support for Authentication out of the box is a solvable, although annoying problem.
Use Cases
Now we know what OAuth 2.0 can’t do, what about actual use cases? Let’s go through some usage scenarios based on different application types.
Previously, I’ve talked about the different Authorization Grant Types and looked at abstract flows. Now I want to map them to typical application types that I often implement:
- Web App
- Mobile App
- Desktop App
- Console App
- Privileged Service
Web App
Consider building a Web App that wants to access a Resource on an Http Server that is protected via OAuth 2.0.
That’s the flow for which OAuth 2.0 was made!

In this diagram I’ve modelled the authorization code flow including the browser, because there are two important things going on:
The Web App initiates the loading of the
Authentication Server’s login page and cannot get a hold of the credentials of the user. It only receives theAuthorization Code.
That’s especially nice in case of third party apps as you wouldn’t trust them with your users login and password.The Web App’s Backend server exchanges the
Authorization Codeagainst theAccess Token. Therefore the Browser (and also the User) does not get a hold of theAccess Token.
That’s also nice, because the token is not exposed in an internet cafe or on an unlocked laptop.
Mobile App
Consider building a mobile app that wants to access a Resource on a Http Server that is protected via OAuth 2.0.
There are basically two options:
- Either use a WebView to load the login page of the
Authentication Serverinside of the app and therefore follow theImplicit Code Flow.

- Or ask the User directly for his username and password and follow the
Resource Owner Password Credentialsflow.

Both of these approaches are problematic. In the second case, it’s clear that the user credentials are exposed to the app, but even the first case is also dangerous, because:
Instead of using a WebView the app could simply spoof the login page, as the user can’t be sure that he is inside a sandboxed browser.
Even if the Application is trustworthy and uses a WebView and really loads your login page, you are training your users to put trust in your login ui even if they cannot validate the origin. Which in turn increases the likelyhood of them falling for phishing attacks later on.
Desktop App
As far as accessing OAuth 2.0 protected resources, building a desktop app is very similiar to a mobile app.
You can either use the Implicit Flow or the Resource Owner Password Credential Flow.
The main difference is that WebViews are usually more cumbersome to implement, so it’s way easier to go for the Resource Owner Password Credential Flow.
Console App
If you are building a console app you will be unable to redirect to the Authentication Server’s login page, therefore you will need ask the user for his or her username and password and follow the Resource Owner Password Credentials flow.
Privileged Service
When you are developing a privileged service that runs without user interaction you would implement the Client Credentials flow.
For example you could create a Resource Owner for the Service and provide the credentials in a configuration file.
Summary
In all but the third party Web App scenario OAuth still depends trusting the Application to do the right thing. Either to not spoof the login screen or to handle the user credentials carefully.
Implementations
I am not going to go into much detail about specific implementations as there are many different options and they depend on usage scenario and language preferences. Instead I’ll give only some general recommendations for picking a client library based on what I’ve found.
Because there a lot of different flavours of OAuth, you probably can’t reuse the same client library for all providers.
So if you need to integrate with a specific OAuth Provider, probably the best option is to first check if there is an official client library or SDK for your favourite programming language available that already wraps the OAuth calls.
An additional advantage of that approach is that you get all the other capabilities of their API wrapped as well.
For example Facebook provides an official PHP based SDK.
Using Unofficial Client SDKs
If there is no SDK available for your favourite programming language, the next best thing is probably an unofficial opensource SDK for a specific OAuth Provider.
Using OAuth Client Libraries
In case you want to integrate with multiple OAuth Providers, you could also take a look at client libraries that support multiple OAuth Providers. As they are focused on the multiple providers, they usually handle only the OAuth part, so you still have to handle the provider specific resource requests yourself.
An example is the OAuth2 client library for C#. You can see that to support all those different providers a custom implementation is used for each.
As an alternative you can write the OAuth calls yourself, but you are probably saving time by not reinventing the wheel.
Server Libraries
First of, there is no “default” or “goto” implementation of OAuth 2.0. The reason being that the different companies that are part of the OAuth 2.0 working group wouldn’t agree on one. Everyone wants their language and implementation to be the “correct” one.
If you are looking for general purpose client or server OAuth libraries, a good place to start is the official OAuth 2.0 Website’s list of libraries.
Conclusion
If you are developing a Client Web Application that wants to access Resources that are protected by a third party OAuth 2.0 provider you will have to implement the client side of OAuth, but with a matching SDK that’s rather straightforward.
Things look different on the server-side, as there are a couple of problems with OAuth 2.0 - for me the following are the most pressing:
- Too complicated for what it does, you need to implement at least three RFCs
- Missing basic functionality for common scenarios like Authentication
- Limited usefulness outside of specific scenarios like third party Web Apps
- Extensibility and vagueness cause differences in implementation
All of the above make me wary of implementing OAuth 2.0 server-side and my advise is to stay away unless you have very specific reasons not to.
What might those reasons be?
- You are working in an enterprise environment
- You expect lots of custom built apps
- Many of them are WebApp
- You plan to implement Open ID Connect
- You are willing to spent more time and money than is strictly necessary to solve the problem
If that’s not you, than you are probably better off skipping OAuth 2.0.
References
- OAuth 2.0. RFC (https://tools.ietf.org/html/rfc6749)
- OAuth 2.0 Homepage (https://oauth.net/2)
- OAuth Wikipedia Page (https://en.wikipedia.org/wiki/OAuth)
- OpenID Connect (http://openid.net/connect/)
- OAuth 2.0 Lead Author resigns Blogpost(https://hueniverse.com/oauth-2-0-and-the-road-to-hell-8eec45921529)
- OAuth 2.0 Common Authentication Pitfalls (https://oauth.net/articles/authentication)
- OAuth 2.0 Authorization Framework: Bearer Token Usage RFC 6750 (https://tools.ietf.org/html/rfc6750)
- OAuth 2.0 Client and Server Libraries (https://oauth.net/code/)
- [ (https://github.com/titarenko/OAuth2)]
Get Contributor stats from git
TLDR;
Abstract: This article is about getting contributor stats from a git repository.
Solution:
- To get the number of commits for each user execute
git shortlog -sn --all - To get the number of lines added and delete by a specific user install q and then execute:
git log --author="authorsname" --format=tformat: --numstat | q -t "select sum(c1), sum(c2) from -"
Conclusion:
- q is cool, put it in your toolbelt.
- Don't use those stats as a base for calculating salaries.
Overview
Last week I wanted to retrieve simple stats about contributors from a git repository.
I came up with the following two stats:
- Commits per Contributor
- Lines changed per Contributor
Stats from git
Commits per Contributor
Getting the number of commits for each contributor is easy with git, just execute:
git shortlog -sn --alland you will get an output like this:
3 authorWhich will show you the number of commits for each user.
The command is broken up as follows:
git shortlogsummarizesgit log-ssuppresses the description of the commits and shows only the commit count-nsorts the output by most commits descending--allshow it for all branches
Lines changed per Contributor
The second thing I was interested in, was the number of lines changed.
Git is able to tell you the number of lines changed per file for each commit. When we now restrict the shown commits only to a specific author, we will be able to get a list of all changes he or she did for all files.
This can be accomplished with the following git command: git log --author="authorsname" --format=tformat: --numstat
The command can be broken down like so:
git logshows info about commits--author="name"shows only info about a specific author. You could also use--committer="name"if your author and committer are always the same.--format=tformat:is a nice one, it uses an emptytformatstring to basically get rid of every information, so this outputs an empty string for each commit.--numstatadds the number of lines added and delete for each file of the commit.
This leaves us with one remaining problem: How to sum up all those single lines in case we don't care about the name of those files? Well, we will need to use another tool to do it, the question is, which one?
I had the following ideas:
- Write a custom shell script by glueing together different commandline tools
- Write a custom commandline tool
- Use Excel
So I looked at all of them:
- A shell script would need to use additional tools and would probably be pretty brittle - it would break on different versions of the tools used, depend on a specific shell and have very slim chances of working cross platform. If I am forced to write something, new I'd rather write a small commandline tool then.
- Nah, on second thought, I don't want to do that either, I was looking for something more out of the box for such a generic task.
- Are you kidding me, we are at the commandline here?!
Then it dawned on me: What I wanted to do was calculate aggregates over columns - and there is already a great way to express that: SQL!
The question is, how can I run a sql statement against that output without the overhead of pushing it to relational database first?
This is were the great little command tool q (https://github.com/harelba/q) comes in!
It can run a sql query against data coming from csv and STDIN. The command that I used (including the sql query that calculates the sums of all added and deleted files) for q is q -t "select sum(c1), sum(c2) from -".
The query can broken down as follows:
-tuse tab as the separator between columnssum(c1)the sum of the first columnsum(c2)the sum of the second columnfrom -from STDIN
Now we only need to pipe the output of the git command into our call of q.
Therefore to get the number of lines changed per contributor you need to:
- Install q as explained here.
Execute
git log --author="authorsname" --format=tformat: --numstat | q -t "select sum(c1), sum(c2) from -"And you will get an output like this:
4 1which is the number of added and deleted rows.
Svn
If you are working with svn, you could try the git svn bridge and clone a repo from svn first, like so: git svn clone url_to_your_repository
Conclusion
While getting stats like commits per contributor and lines changed is rather easy using git, those stats may not be as useful as you think for measuring developer contribution:
They are not comparable in and off themselves. Comparing the number of added F# lines with added lines to a XML Config file is maybe not the best idea.
They can easily be gamed. For example by adding and removing additional lines, and splitting changes over multiple commits and multiple lines - you will get what you measure.
Last but not least: They measure almost always the wrong thing. Nobody cares about lines and commits - imho far more important are code coverage, issues solved, good communication, on boarding new team members and so on.
So take stats like this with a grain of salt, or better a spoon and don't base any important decisions upon them!
On one hand, maybe those stats aren't so great after all, on their own, they seem more like vanity metrics instead of actionable data. But on the other hand, I've put a new and flexible tool into my toolbelt today :)
References
Use a XBox Controller to control your Angular2 App
TLDR;
- For repeated multiple choice data entry you might want to consider alternative forms of input, like e.g. a gamepad.
- Gamepad support is provided by XInput on Windows.
SendInput()allows sending of Keyboard events to foreground applications- Combine both in a simple application
- Add Hotkey support to your Angular2 app
- Now you are able to control your app with an XBox Controller
Who would want that?
A customer had an interesting idea - he asked if there were alternative user input devices available that could be used for data entry for an Angular2 Intranet Application that I was working on.
His reasoning was that the WebApp was used for data entry - and lots of it! After login, the application basically consists of a main loop that would present it's user with visual and textual information and would ask the user to take a decision based on it. As the possible input is limited and speed for data entry is paramount, hotkeys support was introduced. I've wrote my take on hotkey support here. But additionally the customer was worried about the amount of stress that an employee could suffer from repeated usage.
The customer asked for ergonomic input devices that could be used in addition to a keyboard. The idea was to allow the users to freely switch between different devices if he felt uncomfortable using one.
Why the XBox Controller?
An ergonomic input device in widespread use that is also within budget are Gamepads. They are basically made for varying methods of input and allow extended usage with minimum strain.
Additionally I knew that the WebApp was used as an intranet application and the customer was using Windows Machines, which do have native support for XBox Controllers and on which additional software could be installed.
Support for gamepads and joysticks on Windows is provided via XInput or the now deprecated DirectInput API - both of them are a part of DirectX.
The XBox Controller works with XInput and DirectInput and most of the third party Gamepads provide a hardware switch for changing between XInput and DirectInput. This comes in handy if your game or app supports only one API, but not the other.
Getting access to the XBox Controller
So the first obstacle was to get access to the XBox Controller, as you cannot get access to DirectX (and specifically XInput) from an Angular Application directly. For this, a native Windows Application was necessary.
I opted for a C# Wpf Application and chose SharpDX (http://sharpdx.org), which is a thin wrapper for the C++ DirectX Api.
Polling the Controller
XInput comes with a poll based API, which is perfect for it's natural audience, that is games. They usually poll the state of the controllers inside of their main loop and do immediate mode rendering - it all fits together.
Example of polling the Keystroke:
var controller = new Controller(UserIndex.One);
Keystroke keystroke;
var result = controller.GetKeystroke(DeviceQueryType.Gamepad, out keystroke);
if (result.Success)
    ...
or the more concise :
var controller = new Controller(UserIndex.One);
if (controller.GetKeystroke(DeviceQueryType.Gamepad, out Keystroke keystroke).Success)
    ...
From Polling to Pushing
In this case however, I am creating a normal Windows Desktop Application using retained mode drawing and I would prefer a push based interface for the gamepad events. That's why I've chosen to wrap the poll based API inside of my application with push based events.
For exposing the push events to the rest of the application, you can use c# events or plain callbacks using delegates, but I've chosen Reactive Extensions as I greatly prefer the interface.
So my interface looks like this:
public interface IXInputService
{
    bool IsListening { get; set; }
    IObservable<Keystroke> Keystrokes { get; }
    IObservable<ControllerConnected> Connected { get; }
}
For implementing the continuous polling there are also a couple of options, for example a timer, a delayed task, a thread pool thread or the Application Idle event.
I've chosen to spin up a dedicated Thread, as the thread is both long running and the timing between each Poll request is fixed.
To test it out, I created a small Wpf prototype app (XInput2Key), that is able to read out the state of the gamepad's buttons and shows if they are currently pressed.
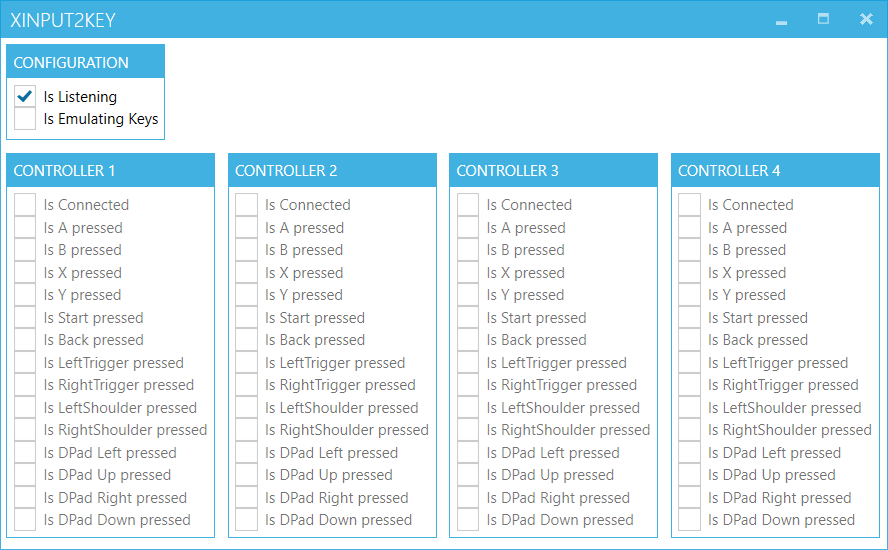
XInput2Key
Interfacing with Angular2
Now I was able to read out the gamepad input and the only thing that remains is to interface with the angular2 application. As I mentioned previously, the application already had hotkey support, so the obvious choice was to just send keyboard input to the angular application.
This has the additional advantage that the applications are very loosely coupled and you can use one without the other. This allows using the XInput application to work with any other application as well, as long as the target app has somekind of hotkey support.
As I already took a dependency on the host operating system being windows (for the DirectX support), I took a quick look at the native Windows Api and chose the SendInput() function. This function allows sending of keystrokes and mouse events to the foreground application, which in my case would be a browser with the loaded angular2 application.
To access the native C WinApi Method, I needed [DllImport] declarations for SendInput() which I luckily found on PInvoke.net.
Thanks to both SharpDX and PInvoke.Net I was quickly able to throw together a prototype application that:
- reads in a config file to for mapping the gamepad buttons -> keyboard keys
- listens for gamepad button presses using XInput
- maps them to keystrokes
- sends the keystrokes to the foreground application using
SendInput()
Sample App
I've pushed the resulting app to github (https://github.com/8/XInput2Key) incase you want to try it yourself.
If you check the Checkbox 'Is Emulating Keys', then the mapped keyboard input is sent to the foreground window. If you open up an instance of your favourite text editor, you can try it out.
XInput2Key
The only caveat is that due to security constraints of SendInput() it cannot send input to applications running with administrator rights, if the app isn't started with administrator rights itself.
Setting up Angular2 to deal with Hotkeys
For hotkey support in angular I am basically using the javascript library mousetrap with an angular2 wrapper. If you're interested in how I've done that, you can check out my blog post about using Hotkeys in Angular2.
References
- SharpDX (http://sharpdx.org)
- XInput and DirectInput
- PInvoke.net (http://pinvoke.net)
- SendInput() function (https://msdn.microsoft.com/en-us/library/windows/desktop/ms646310(v=vs.85).aspx)
- Mousetrap Javascript Library (https://craig.is/killing/mice)
- XInput2Key Sample App (https://github.com/8/XInput2Key)
- Blog Post: Hotkeys in Angular2 (http://lostindetails.com/blog/post/Hotkeys-in-Angular2)
Hotkeys in Angular2
Background
For the app that I was building for a customer, I needed hotkey support for Angular2. For a plain old javascript web app, I've used the excellent javascript library mousetrap (https://craig.is/killing/mice) to great success and I wanted to use it in angular2 app as well.
Mousetrap for angular => angular2-hotkeys
As it turns out, somebody already created an nice angular2 wrapper for mousetrap called angular2-hotkeys (https://github.com/brtnshrdr/angular2-hotkeys) that wraps mousetrap and allows you to import a HotkeysService and register keys for it.
To install it, simply follow the instructions in the README.
Now a component can just request the HotkeysService in it's constructor and register a hotkey for itself by invoking the HotkeysService.add() method.
Additionally, the component should also remove the hotkey once it gets destroyed. To do this, we store the returned value of the HotkeysService.add() method and supply it as an argument to the HotkeysService.remove() method when the component is destroyed.
In Angular, this can be done by implementing OnDestroy and it's ngOnDestroy method. When the component gets destroyed, angular invokes the method and and the previously registered hotkey is removed.
A complete example could look like this:
import { Component, OnDestroy } from '@angular/core';
import { HotkeysService, Hotkey } from 'angular2-hotkeys';

@Component({
  selector: 'app-root',
  templateUrl: './app.component.html',
  styleUrls: ['./app.component.css']
})
export class AppComponent implements OnDestroy {
  title = 'app works!';
  hotkeyCtrlLeft: Hotkey | Hotkey[];
  hotkeyCtrlRight: Hotkey | Hotkey[];

  constructor(private hotkeysService: HotkeysService) {
    this.hotkeyCtrlLeft = hotkeysService.add(new Hotkey('ctrl+left', this.ctrlLeftPressed));
    this.hotkeyCtrlRight = hotkeysService.add(new Hotkey('ctrl+right', this.ctrlRightPressed));
  }

  ctrlLeftPressed = (event: KeyboardEvent, combo: string): boolean => {
    this.title = 'ctrl+left pressed';
    return true;
  }

  ctrlRightPressed = (event: KeyboardEvent, combo: string): boolean => {
    this.title = 'ctrl+right pressed';
    return true;
  }

  ngOnDestroy() {
    this.hotkeysService.remove(this.hotkeyCtrlLeft);
    this.hotkeysService.remove(this.hotkeyCtrlRight);
  }
}
Beyond "Hello World!"
Now this works fine for a simple app, but there are a couple of problems:
- If one component registers a hotkey and a second component also registered the same hotkey, the previous subscription would be overriden.
- Additionally the subscription / unsubscription logic leakes into each and every component that wants to register a hotkey.
- The Hotkey events are not the flexible
Observable<T>as we have come to expect in angular. - Keys are hardcoded inside of each component and therefore difficult to change
Wrapping Hotkeys in a CommandService
To solve that problem, I've introduced a CommandService. It's basically an EventAggregator, that upon initialization reads in a config.json that specifies which keys should be mapped to which commands. It exposes an Observable and registers all the hotkeys specified in the config.json.
Everytime one of those keys are pressed, it triggers the corresponding commands. Instead of importing the HotkeysService itself, all components import the CommandService and subscribe to it's observable. If the user presses a registered hotkey, a Command is triggered and the components check if they are interested in the comand and if so, take action.
Besides allowing easy updating of the hotkeys by editing the config.json, this moves the hotkey registration code to one place, which makes switching the hotkeys library a breeze (in case that should be necessary in the future). This approach also captures the essence of what the hotkeys are doing - they are issuing a command to components. It also allows reusing the CommandService to explicitedly raise those commands from other components.
An implementation of the CommandService looks like that:
CommandService.ts
import { Injectable } from '@angular/core';
import { Http } from '@angular/http';
import { HotkeysService, Hotkey } from 'angular2-hotkeys';
import { Subject } from 'rxjs/Subject';
import { Observable } from 'rxjs/Observable';

class HotkeyConfig {
  [key: string]: string[];
}

class ConfigModel {
  hotkeys: HotkeyConfig;
}

export class Command {
  name: string;
  combo: string;
  ev: KeyboardEvent;
}

@Injectable()
export class CommandService {

  private subject: Subject<Command>;
  commands: Observable<Command>;

  constructor(private hotkeysService: HotkeysService,
              private http: Http) {
    this.subject = new Subject<Command>();
    this.commands = this.subject.asObservable();
    this.http.get('assets/config.json').toPromise()
      .then(r => r.json() as ConfigModel)
      .then(c => {
        for (const key in c.hotkeys) {
          const commands = c.hotkeys[key];
          hotkeysService.add(new Hotkey(key, (ev, combo) => this.hotkey(ev, combo, commands)));
        }
      });
  }

  hotkey(ev: KeyboardEvent, combo: string, commands: string[]): boolean {
    commands.forEach(c => {
      const command = {
        name: c,
        ev: ev,
        combo: combo
      } as Command;
      this.subject.next(command);
    });
    return true;
  }
}
An config.json example:
{
  "hotkeys": {
    "left": [ "MainComponent.MoveLeft" ],
    "right": [ "MainComponent.MoveRight" ],
    "ctrl+left": [ "AppComponent.Back", "MainComponent.MoveLeft" ],
    "ctrl+right": [ "AppComponent.Forward", "MainComponent.MoveRight" ]
  }
}
A consuming Component would look like that:
MainComponent.ts
import { Component, OnDestroy } from '@angular/core';
import { Command, CommandService } from './command.service';
import { Subscription } from 'rxjs/Subscription';

@Component({
  moduleId: module.id,
  selector: 'main',
  templateUrl: 'main.component.html'
})
export class MainComponent implements OnDestroy {
  command: string = 'None';
  subscription: Subscription;
  constructor(private commandService: CommandService) {
    this.subscription = commandService.commands.subscribe(c => this.handleCommand(c));
  }
  handleCommand(command: Command) {
    switch (command.name) {
      case 'MainComponent.MoveLeft': this.command = 'left!'; break;
      case 'MainComponent.MoveRight': this.command = 'right!'; break;
    }
  }
  ngOnDestroy() {
    this.subscription.unsubscribe();
  }
}
Sample App
I've pushed a simple sample app that uses the CommandService to github (https://github.com/8/hotkey-sample).
References
Using Win10 Built-in OCR
TLDR;
To get OCR in C# Console- Wpf- or WinForms-App:
- run on a modern Windows Version (e.g.: Win10)
- add nuget
UwpDesktop - add the following code:
var engine = OcrEngine.TryCreateFromLanguage(new Windows.Globalization.Language("en-US"));
string filePath = TestData.GetFilePath("testimage.png");
var file = await Windows.Storage.StorageFile.GetFileFromPathAsync(filePath);
var stream = await file.OpenAsync(Windows.Storage.FileAccessMode.Read);
var decoder = await Windows.Graphics.Imaging.BitmapDecoder.CreateAsync(stream);
var softwareBitmap = await decoder.GetSoftwareBitmapAsync();
var ocrResult = await engine.RecognizeAsync(softwareBitmap);
Console.WriteLine(ocrResult.Text);
OCR Troubles
When UWP (=Universal Windows Platform) Apps were introduced, I was interested in what new APIs came with them. Soon the OcrEngine (https://docs.microsoft.com/en-us/uwp/api/windows.media.ocr.ocrengine) peaked my interest, because it promised a simple and quick way to retrieve text from images.
A simple OcrEngine was something that I was looking for as the alternatives are big and cumbersome to use (I am looking at you Tesseract), discontinued (MODI; was included with Office), in the cloud and/or expensive.
Back then the problem was that you needed to create a UWP Application to access the UWP APIs, but at the same time an UWP Application was completely sandboxed! You couldn't even use any cross process communication (with the exception of using the cloud and a very basic file based approach).
That meant I couldn't use the OcrEngine in a WindowsService or WebService or even over a commandline!
So with that being the case, I put together a quick solution using Tesseract, but I never got around to tuning it and it never performed well.
UwpDesktop
Time went by and then the great Lucian Wischik (https://blogs.msdn.microsoft.com/lucian) published the library uwp-desktop (https://github.com/ljw1004/uwp-desktop) as a nuget package called UwpDesktop.
This package made UWP APIs available to Applications based on the normal .NET Framework. When I read the announcement, I was instantly reminded of my previous failure to make use of the OcrEngine and finally today I took it out for a spin and it worked great!
Example Code
The following code reads in the supplied file and prints out the detected text:
var engine = OcrEngine.TryCreateFromLanguage(new Windows.Globalization.Language("en-US"));
string filePath = TestData.GetFilePath("testimage.png");
var file = await Windows.Storage.StorageFile.GetFileFromPathAsync(filePath);
var stream = await file.OpenAsync(Windows.Storage.FileAccessMode.Read);
var decoder = await Windows.Graphics.Imaging.BitmapDecoder.CreateAsync(stream);
var softwareBitmap = await decoder.GetSoftwareBitmapAsync();
var ocrResult = await engine.RecognizeAsync(softwareBitmap);
Console.WriteLine(ocrResult.Text);
Example Application
I've put together a very simple example app and pushed it to github (https://github.com/8/ConsoleUwpOcr) that makes use of the OcrEngine.
Example Output:
ocr.exe ..\..\..\ConsoleUwpOcr.Test\TestData\testimage.png
Welcome to Thunderbird Donate to Thunderbird Thunderbird IS the leading open source, cross- platform email and calendaring client, free for business and personal use. We want it to stay secure and become even better. If you like Thunderbird, please consider a donation! By donating, you Will help us to continue delivering an ad-free top-notch email client. Make a donation » Other ways to contribute to Thunderbird Now IS a great time for you to get involved: writing code, testing, support, localization and more. Join a global community! Share your skills and Pick up a few new ones along the way. Volunteer as much as you like. Or as little. It's totally up to you. Learn more » Why we need donations You might already know that Thunderbird improvements are no longer paid for by Mozilla. Fortunately there IS an active community keeping it running and developing it further. But to survive long term, the project needs funding. Thunderbird IS currently transitioning to an independent organization. Being independent, we can shape our own fate, but there IS significant infrastructure that must be majntajned to deliver the application to our tens of millions of users. For Thunderbird to survive and continue to evolve, we need your support and ask for your donation today. All the money donated Will go directly to funding Thunderbird development and infrastructure.
References
Fixing ORA-06502 in C
A bug appears
A few days ago a friend asked me to help him figure out a bug that was reported. Thanks to the error report he was already able to trace the bug to a specific code fragment, but he was wondering why it failed - the code looked perfectly fine.
The cause
The code was interfacing with an oracle database and was calling a stored procedure. As a stored procedures can't return a value by itself, the usual way to retrieve data is to use an output parameter. The C# code sets the parameter up by declaring it's type, size and direction and the stored procedure is then able to access and update it. After the control returns back to the caller, you can access the parameter and use it's filled value.
The error message was: ORA-06502: PL/SQL: numeric or value error: character string buffer too small exception
In this case the calling code was:
cmd.Parameters.Add("param1", OracleDbType.Varchar2, 512, Direction.Output);When we took a look at signature of the offending method, we quickly spotted the bug:
public OracleParameter Add(string name, OracleDbType dbType, object val, ParameterDirection dir)The problem was with the third parameter - the caller thought he was initializing the size of the output parameter, but instead he was supplying the initial value - which isn't used for an output parameter anyway.
Fixing the code was easy by setting the size of the parameter explicitedly and we could have called it a day, but I've seen a bug just like this before and so I wondered how this mistake could have happened and I took a second look.
The root cause
Digging deeper, I found the following overload:
public OracleParameter Add(string name, OracleDbType dbType, int size)And then it dawned on me! Can you see what happened?
When the caller of the method started typing, he saw the overload where the third parameter is the size of type int and the correct overload is chosen.
It looked something like this:
cmd.Parameters.Add("param1", OracleDbType.Varchar2, 512But he didn't stop here, he continued on, because he wanted to supply the ParameterDirection as well and the moment he did so, the other overload was chosen, where the third parameter is now the value and not the size!
The caller didn't notice, as an int converts nicely to an object and the signatures match up.
Bad API design
The culprit in this scenario was bad design on oracles behalf when they added overloads that change the semantics of a parameter at a certain position.
If the types of the parameters would have differed sufficently it would only be a nuisance for the developer, as the compiler would have caught the error, but to make matters worse the types used were implicetly convertable from one to the other and therefore the compiler was of no help.
General guidelines for Member Overloading are documented nicely on the msdn and while you may freely ignore those design principles in your own applications (even if they make sense) in a professional public facing API you really should follow them, your customers will thank you for it.
References
Member Overloading on msdn (https://msdn.microsoft.com/en-us/library/ms229029(v=vs.110).aspx)
Binding your View to your ViewModel in Wpf
Overview
When you are using Mvvm you need a way to bind your view to the ViewModel.
While this is always done by binding the DataContext Property of a View to an instance of the specific ViewModel class, there are generally two different scenarios:
- The ViewModel can be retrieved using the current DataContext.
- The ViewModel needs to be retrieved from a global source or created on demand.
While the first first scenario is straightforward, the second is a little more a tricky and in this article I'll show a simple pattern that you can use in your applications to simplify the binding process.
Different Scenarios
If the ViewModel can be retrieved using the current DataContext of a View, then I'll call this scenario "Hierarchical ViewModels" and if this is not the case, then I'll call them "Independent ViewModels".
Hierarchical ViewModels
Background
In the first scenario, you are already within a view that is bound to a ViewModel and you want to bind a child view to a ViewModel that is different than the one in the current DataContext, but one that it holds a reference to.
Often the parent is created by a DependencyInjection container that supplies the child ViewModel to the parent inside it's constructor on instantiation.
The parent than exposes the child ViewModel via a public property.
In the parent view, you can just create a binding that sets the DataContext of the child to this property.
Example
In the following section, I've included an example for a hierarchical setup.
Consider this example consisting of two Views:
- MasterView
- DetailView
that are bound to these two ViewModels:
- MasterViewModel
- DetailViewModel
MasterViewModel.cs
public class MasterViewModel
{
  public DetailViewModel Detail { get; set; }
  ...
}
DetailViewModel.cs
public class DetailViewModel
{
  ...
}
Then the following code can be used to bind the DetailView inside of the MasterView to the DetailViewModel contained inside the MasterViewModels Detail property:
MasterView.xaml
<v:DetailView DataContext={Binding Detail} />Note: As the Source of the Binding defaults to the current DataContext, the Source property of the Binding does not need to be set explicitly and the the Binding needs only to contain the path to the ViewModel.
Independent ViewModels
Background
Then there there are Independent ViewModels, which don't know of each other. This is the case for all base ViewModels, who are the "entry points" for all hierarchical setups.
Some examples:
- The first ViewModel that is bound to a view, eg.
MainViewModel, when there is no existing DataContext - Independent ViewModels for cross cutting concerns like
- navigation eg. the Menu
- information eg. the Statusbar and Notifications
In those cases, there current DataContext of the View does not contain a property that we can use, so we need to access some kind of central Locator or Factory, which is probably backed by an IoC Container that knows how to retrieve or create the requested ViewModel.
Example
Now setting up independent ViewModels or the first ViewModel when no DataContext is yet available, requires a little more work.
I've come with this simple pattern to make the ViewModels available for binding inside each view.
Create a Locator that exposes the ViewModels that your views require via properties.
- Add an instance of the locator as a static resource to your Application. This should be done on Application Startup, for example by:
- Creating an Instance declaritively in your app.xaml file
- Subscribing to your applications Startup event and setting it using the
Resourcesproperty.
- Bind the View to the ViewModel by using the Locator as a Source using the StaticResource Binding.
Locator
As the first step, we need to create a locator that exposes the ViewModels that will be requested by from within a view.
The Locator exposes the ViewModels as properties, that makes binding against them easy using the normal binding syntax.
You can take the manual approach, where you implement each new ViewModel as a new property of the Locator yourself or you can use a dynamic approach where the ViewModels are lookup by your dependency injection container.
An example for the manual approach would look like something like this:
Locator.cs (manual)
public class Locator
{
    public MainViewModel { get { return new MainViewModel(); }}
}
As the manual approach gets tedious really fast, I've opted for the dynamic approach.
My implementation is based on DynamicObject that allows me to forward the property accessor to a dependency resolver for fulfillment.
Locator.cs (dynamic)
/// <summary>Locator that forwards property access to the Dependency Resolver</summary>
public class Locator : DynamicObject
{
  /// <summary>Gets or sets the resolver that is used to map a property access to an instance</summary>
  public Func<string, object> Resolver { get; private set; }

  public Locator(Func<string, object> resolver)
  {
    this.Resolver = resolver;
  }

  public override bool TryGetMember(GetMemberBinder binder, out object result)
  {
    bool successful;

    string property = binder.Name;

    var resolver = this.Resolver;

    if (resolver != null)
    {
      try
      {
        result = resolver(property);
        successful = true;
      }
      catch { result = null; successful = false; }
    }
    else
    {
      result = null;
      successful = false;
    }

    return successful;
  }
}
The locator is supplied with a Func in it's constructor that resolves the request for the ViewModel based on the requested property name.
For example, let's say you are using Autofac as a dependency resolver and you've configured Autofac to resolve your ViewModels by looking them up from your ViewModel namespace using a simple convention like this:
ContainerBuilder builder = new Autofac.ContainerBuilder();
builder.RegisterAssemblyTypes(Assembly.GetExecutingAssembly())
  .InNamespace("WpfMvvmExample.ViewModel");
var container = builder.Build();
Now you can create an instance of the Locator like this:
var locator = new Locator(property => container.Resolve(Type.GetType($"WpfMvvmExample.ViewModel.{property}")));
Note: As the binding path used inside a view is just a string and evaluated at runtime and not strongly typed, using a dynamic object fits nicely, as we don't lose any type information.
Add the initialized Locator
Now it's time to add the Locator to someplace where your views can access it. The Application_Startup method inside the App class is a good place for that.
App.xaml.cs
ContainerBuilder builder = new Autofac.ContainerBuilder();
builder.RegisterAssemblyTypes(Assembly.GetExecutingAssembly())
  .InNamespace("WpfMvvmExample.ViewModel")
  .SingleInstance();

var container = builder.Build();

this.Resources["Locator"] = new Locator(property => container.Resolve(Type.GetType($"WpfMvvmExample.ViewModel.{property}")));
Bind the View to the ViewModel
Finally we can use the Locator inside of a view to use it to bind to a ViewModel. We reference the Locator as the bindings Source property and point the path property to the required ViewModel type.
MainWindow.xaml
<v:MainView DataContext="{Binding MainViewModel, Source={StaticResource Locator}}" />Example Code on github
I've uploaded an small example application to github that contains the Locator and the setup in case it is useful for anybody else.
If you have any comments please feel free to drop me a line in the comments below, thanks!
Take care,
-Martin
References
SkiaSharp with Wpf Example
Background
After SkiaSharp was announced by Miguel de Icaza on his blog, I downloaded the nuget and took it for a spin and used it for some image manipulation.
While the sample code got me started, it was written for System.Drawing/GDI+ and when I later wanted to use it in a Wpf app, I didn't find any sample code for that. So I wrote some code and this blog post, in case someone else might find that useful.
Drawing a Bitmap in Wpf
ImageSource and WriteableBitmap
Basically, when you're using Wpf you most often want to use an ImageSource, for example to display it within an Image control. When creating an ImageSource yourself, the WriteableBitmap comes in handy. It is not only a subclass of ImageSource, it's also double buffered, which allows a smooth udpate process.
Sourcecode
I've written the following code to do that:
public WriteableBitmap CreateImage(int width, int height)
{
  return new WriteableBitmap(width, height, 96, 96, PixelFormats.Bgra32, BitmapPalettes.Halftone256Transparent);
}
public void UpdateImage(WriteableBitmap writeableBitmap)
{
  int width  = (int)writeableBitmap.Width,
      height = (int)writeableBitmap.Height;
  writeableBitmap.Lock();
  using (var surface = SKSurface.Create(
    width: width,
    height: height,
    colorType: SKColorType.Bgra_8888,
    alphaType: SKAlphaType.Premul,
    pixels: writeableBitmap.BackBuffer,
    rowBytes: width * 4))
  {
    SKCanvas canvas = surface.Canvas;
    canvas.Clear(new SKColor(130, 130, 130));
    canvas.DrawText("SkiaSharp on Wpf!", 50, 200, new SKPaint() { Color = new SKColor(0, 0, 0), TextSize = 100 });
  }
  writeableBitmap.AddDirtyRect(new Int32Rect(0, 0, width, height));
  writeableBitmap.Unlock();
}
Basically, what we want to do is:
- Create a WriteableBitmap of the appropriate size
-
Update the WriteableBitmap with Skia
- Lock the Backing Buffer
- Use Skia with the matching pixelformat to draw into the backing buffer
- Mark the Bitmap as dirty
- Unlock the Bitmaps Backing Buffer again
Example Wpf App
Now that I was able to render an Wpf image with Skia and the WriteableBitmap class supports double buffering, I wanted to create a quick app that updates the Image once per frame.
For that, I've subscribed the CompositionTarget.Rendering event and updated the render method to draw the number of elapsed frames. You can see the output on the screenshot below:
Screenshot

Sourcecode on Github
If you're interested in the example app, I've uploaded the source of the SkiaSharp Wpf Example Application to github at https://github.com/8/SkiaSharp-Wpf-Example
If you find any of that useful or I am missing something, please feel free to drop me a comment below, thanks!
Take care,
Martin
References
- System.Drawing/GDI+ (https://msdn.microsoft.com/en-us/library/system.drawing%28v=vs.110%29.aspx)
- ImageSource on msdn (https://msdn.microsoft.com/en-us/library/system.windows.media.imagesource%28v=vs.110%29.aspx)
- WriteableBitmap on msdn (https://msdn.microsoft.com/en-us/library/system.windows.media.imaging.writeablebitmap%28v=vs.110%29.aspx)
- SkiaSharp (https://developer.xamarin.com/guides/cross-platform/drawing/)
- Cross-Platform 2D Graphics with SkiaSharp (https://blog.xamarin.com/cross-platform-2d-graphics-with-skiasharp/)
- SkiaSharp Wpf Example App on github (https://github.com/8/SkiaSharp-Wpf-Example)